Installing a new AC unit is a major project, especially if this is your first time adding a system of this type. Whether you’re upgrading an older system or starting from scratch, knowing what happens from the first visit to final testing can help you feel comfortable with the work ahead.
At Landen Heating and Cooling, in Zebulon, NC, we help homeowners understand every step so there are no surprises.
Evaluating Your Home’s Cooling Needs
Before the installation begins, we will help you determine what kind of AC equipment you need. The size of your home, the layout, and even how much sun your house gets during the day all affect how well an air conditioner will work. A unit that’s too small runs nonstop and never fully cools your home.
A unit that’s too big can short cycle and wear out faster. You’ll want to work with our team, as we have experience performing a load calculation using information like square footage, insulation levels, window placement, and airflow restrictions.
Suppose you’ve made recent upgrades, such as installing new windows or adding a finished basement. We take this into account rather than just looking at the existing AC equipment you have.
Planning Around Your Current HVAC Setup
Some homes already have usable ductwork, while others don’t have any. What’s in place now shapes how your AC installation proceeds. If you’re swapping out an old central unit, our installer will inspect the ducts for gaps, damage, or buildup that might get in the way of airflow. If you’re going from window units to central air, they’ll figure out where ducts can run cleanly without interfering with your existing structure.
This step also includes checking the electrical panel in your home. Central AC systems draw a fair amount of power, and your breaker box needs to handle that load without tripping. If the panel’s too old or the amperage is maxed out, it might need an upgrade first.
Choosing the Right Type of System
If you have ductwork in place, a split system makes sense. If you don’t have ducting, a packaged or ductless mini-split setup might work better. It all comes down to your layout and how you want to control the temperature of your home.
For example, if you want consistently cool air upstairs without over cooling the main floor, zoned systems offer better flexibility. Some homeowners opt for variable-speed units that adjust their output based on indoor conditions. These can cost more in terms of the initial cost but usually help reduce your energy bill through more stable runtime. Think about how your family moves through the house, which rooms stay in use, and how your energy use tends to spike during summer. The best system doesn’t just cool your home. It works with your routine and keeps up without failing.
Removing the Old Unit and Prepping the Site
Your installer will start by clearing out your old system if there’s one in place. This includes disconnecting the condenser outside, unhooking refrigerant lines, and removing the evaporator coil inside the house. Proper removal includes recovering the old refrigerant so it doesn’t get released into the air, which is required by law.
If you’re moving to a different type of system, the installer will prep the space for the new unit. That might include pouring a new pad outside for the condenser, cutting in a new air return, or mounting brackets for a wall unit. Any exposed ductwork gets sealed, cleaned, or replaced if needed.
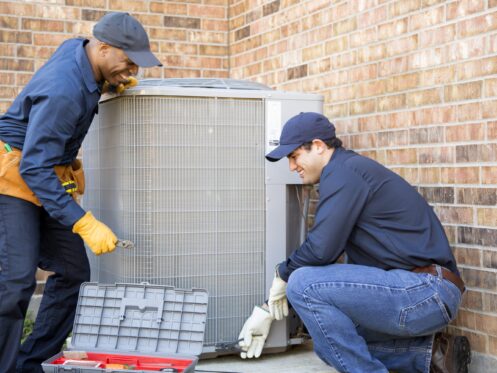
Installing the New Indoor and Outdoor Units
Installation usually starts with the indoor components. Our team will install the evaporator coil and connect it to the air handler or furnace. They’ll seal the coil housing, check for air leaks, and make sure the drain pan can collect condensation without spilling.
Outside, a crew mounts the condenser, hooks up the refrigerant lines, and connects it to your panel. Every joint needs to be tight and clean, or performance drops.
Charging the System and Final Pressure Testing
After the mechanical parts are in place, your AC system needs to be charged with the right amount of refrigerant. Too little, and the system won’t cool the air properly. Too much and you risk damaging the compressor. A technician uses gauges to monitor pressure levels and compares them to the manufacturer’s specifications. The refrigerant level depends on the line length, outdoor temperature, and how your specific unit operates under load.
Once charged, the system runs through a series of checks. These include pressure tests, voltage readings, and airflow measurements. Every room gets checked for output to make sure no vent is underperforming. If the installer notices low airflow or warm spots, they’ll investigate the ductwork and adjust the fan speed or damper positions. These final steps help your new system work the way it should on day one, without surprises.
Connecting the Thermostat and Setting Up Controls
Your thermostat acts like the brain of your HVAC system, so getting it calibrated correctly matters. We will mount your thermostat in a central location away from direct sunlight, windows, or supply vents. This helps prevent false readings that could cause your system to short-cycle or run excessively. If you’ve chosen a programmable or smart thermostat, you’ll get a walkthrough on how to use the settings before we leave.
Smart thermostats typically connect to a smart device using Wi-Fi, giving you control from your phone regardless of where you are. You can set it to cool the house at certain times or even turn it on when someone is arriving home. Some models pick up on your usage patterns and make changes on their own. If you haven’t used a smart thermostat before, it’s worth asking a few setup questions while you have access to our professional knowledge.
Final Walkthrough and First Cool Cycle
Once everything is installed, connected, and charged, the installer will run the system through its first full cooling cycle. This isn’t just a switch-on-and-go moment. We will stay with the unit as it turns on, checking how quickly the air cools, how the vents perform, and whether the condenser stays quiet and stable outside.
You’ll get a final walkthrough, which includes discussing the basics of what was installed, how to change filters, where to check for warning lights, and what maintenance to schedule next. If anything looks or sounds abnormal later, you’ll know what’s normal and what needs attention from our team.
Schedule Your AC Installation Now
A successful AC installation doesn’t happen by chance. It starts with planning, includes a detailed walk-through, and ends with a smooth test run that sets you up for reliable comfort. Along the way, you learn more about your home’s energy use, airflow, and equipment needs. Once everything is in place, you’ll feel that difference right away in cooler rooms, quieter cycles, and fewer unexpected hiccups.
In addition to installations, Landen Heating and Cooling also provides system tune-ups and AC troubleshooting support to ensure smooth operation. Schedule your AC installation with Landen Heating and Cooling in Zebulon and take the first step toward a more comfortable home today.